How to install Java 21
How to download and install Java 21
The next long-term support (LTS) release of the JDK will be officially released in September of this year, but if you’re interested in testing out any of the new preview features, here’s how to quickly install Java 21 on your Windows or Linux desktop:
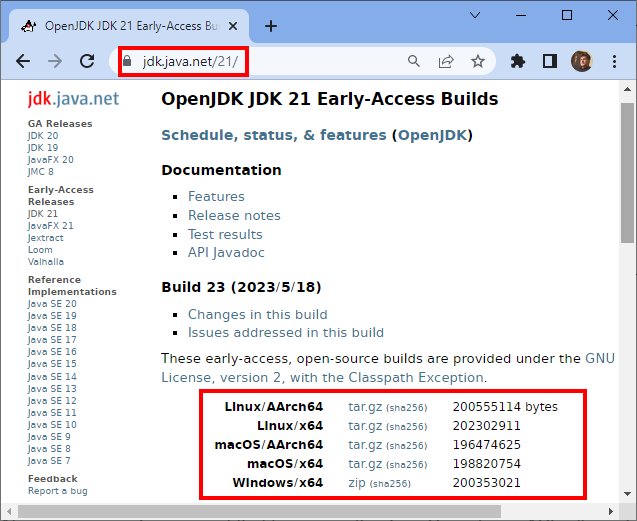
- Navigate to jdk.java.net/21/ and download your platform’s zip file
- Extract the Java 21 zip file to a sensible location on your filesystem
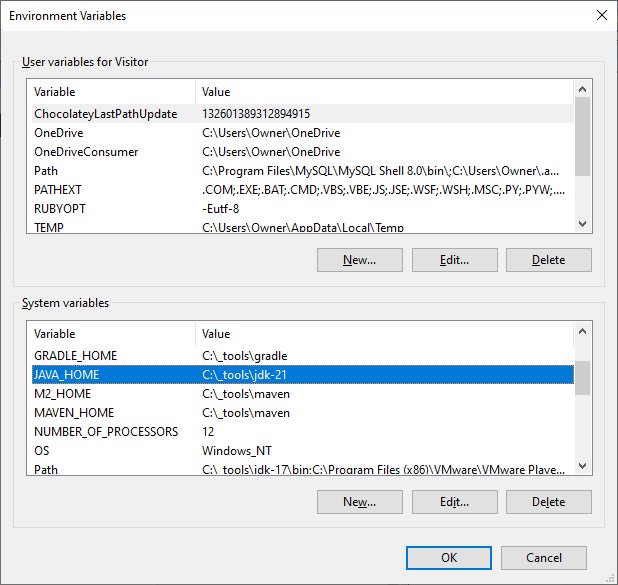
- Configure the JAVA_HOME environment variable
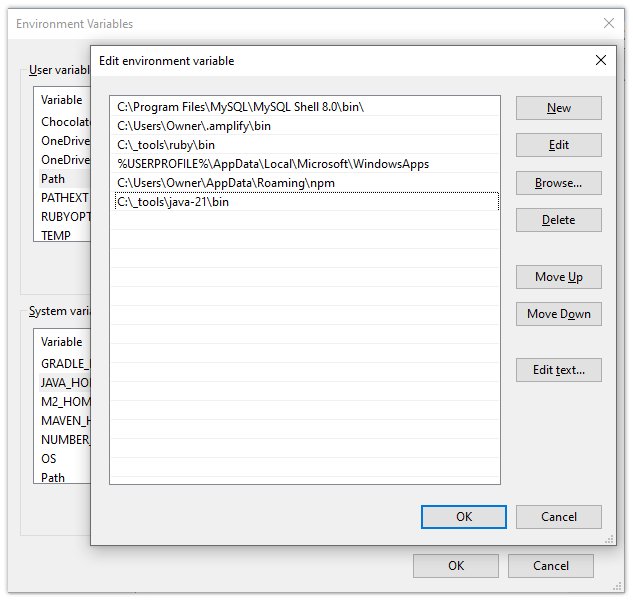
- Add the JDK’s \bin directory to the PATH of the OS
- Issue a java -version command to ensure the Java 21 install succeeded
Where do I download the Java 21 JDK?
Once Java 21 goes GA, I would likely recommend downloading a distibution from Adoptium or Azul or even Microsoft. For early access you need to go to java.net and download the latest build of the OpenJDK.
Extract the contents of the Java 21 JDK zip file
The download is just a zip file, so the contents can be extracted anywhere onto your local filesystem.
The extraction will contain a folder named java-21. Copy this folder to where you want the Java 21 JDK to permanently reside.
In this example, I’ve copied the Java 21 JDK to a folder named C:\_tools.
Configure JAVA_HOME for the JDK
It’s customary to add an environment or system variable named JAVA_HOME that points to the location of the JDK install.
Why set JAVA_HOME?
Your Java installation will still run without JAVA_HOME being set, but this system variable does two important purposes:
- It tells programs that have a Java dependency on where the JDK is installed
- If multiple JDKs are installed, JAVA_HOME points to the preferred Java instance to use
Add the Java 21 bin directory to the PATH
To make the Java runtime, along with various other important utilities available through the command line, the location of the Java 21 bin directory must be added to the operating system’s PATH variable.
Along with the Java compiler and the Java runtime executable, adding the Java 21 bin directory to the path provides command-line access to:
- The JShell REPL tool
- The JavaP decompiler
- The Java dependency checker JDeps
- The JavaDoc generator
- The JAR signer utility
The PATH must point to the JDK’s bin directory, not the root of the installation folder as with JAVA_HOME.
Verify the Java 21 install
Once the JDK is installed, JAVA_HOME is set and the PATH is updated, open up a terminal window and type:
java -version
The result of this operation should reveal a Java 21 early edition installation was successful.
Java 21 functionality and preview features
With the Java 21 install complete, go ahead and compile some code and test out some of the exciting Java 21 preview features and core functionality including:
- Unnamed classes
- Instance main methods
- Unnamed patterns
- Generational ZGC
- Record patterns
- Switch pattern matching
- Sequenced collections
- Virtual threads
Java 21 will have a huge impact on the way programmers approach modern software development.


